Official Guide · iPhone / iPad
Shadowrocket Setup Guide
Follow five steps: import, choose a routing mode, connect, verify, and troubleshoot. First establish a connection you can reproduce, then adjust rules and settings as needed.
Make sure you have a working basic network connection, and keep the original details from your service provider handy. Don’t change the server, rules, and DNS at the same time; otherwise, it will be difficult to identify the cause of a problem. If Shadowrocket already contains configurations, keep the existing Config and server entries until you’ve confirmed the new setup works. Screenshots are for identifying screens and fields, not for copying server settings.
STEP 01 / IMPORT
Add Server: Add a server or import a subscription
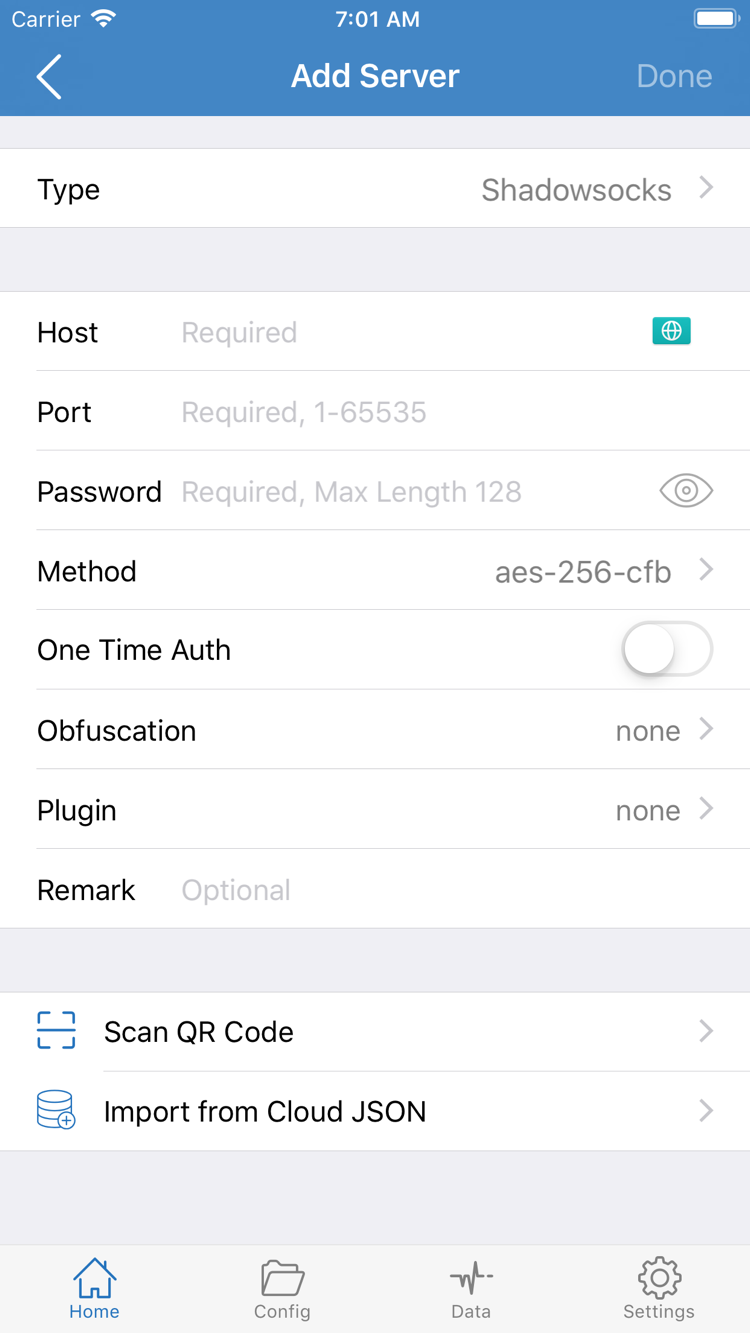
Open Shadowrocket and go to Home. The SERVER section may be empty the first time you use the app. Tap the add button in the upper-right corner to open Add Server. Choose one import method: use the subscription flow if you have a subscription URL, or enter the complete details manually if you have the information for a single server. A subscription URL and a server address are different types of information; don’t enter one in the field for the other.
Have a subscription URL? Select Subscribe
In Add Server, tap Type and select Subscribe, then enter your full subscription URL in the URL field. Give the subscription a recognizable name. Check for extra spaces, line breaks, or quotation marks introduced during copying, then save. Subscription URLs often contain access credentials. Keep them private, don’t post them in public forums, and don’t show the full URL in screenshots.
After saving, return to Home and wait for the subscription to load. When it loads successfully, the corresponding server entries will appear. Check the names and select one for testing. If you see a subscription group but no servers, don’t connect yet. Confirm that the URL can be read and the service is active, then try updating it. A subscription maintains a server list; it doesn’t select the Config used for routing.
Have server details? Fill in each field for the selected Type
To add a server manually, first select the Type that matches your details, then enter the Host, Port, and authentication fields required by that protocol. The screenshot shows fields such as Password and Method, but the form varies by Type. For example, a configuration that uses a UUID cannot be entered using the password field instructions. Match TLS, transport, and server name settings to the original details; don’t fill in values based on guesswork.
Enter the server domain or address in Host, without a webpage path. Enter Port as provided. Check Password, UUID, and other authentication details for case and leading or trailing spaces. Change other options only when your provider’s details specify them. If you have a QR code, scan it with Scan QR Code in Add Server, then review the recognized fields before saving. Import from Cloud JSON is a different configuration source; don’t enter an ordinary subscription URL there.
Check your work: Return to Home and confirm the server entry appears and is the one you just imported. If you’re unsure how Type, Subscribe, and Config differ, see the glossary. Once you’ve confirmed the entry is complete, choose Global Routing next rather than changing several connection settings at once.
STEP 02 / ROUTING
Global Routing: Choose a routing mode and Config
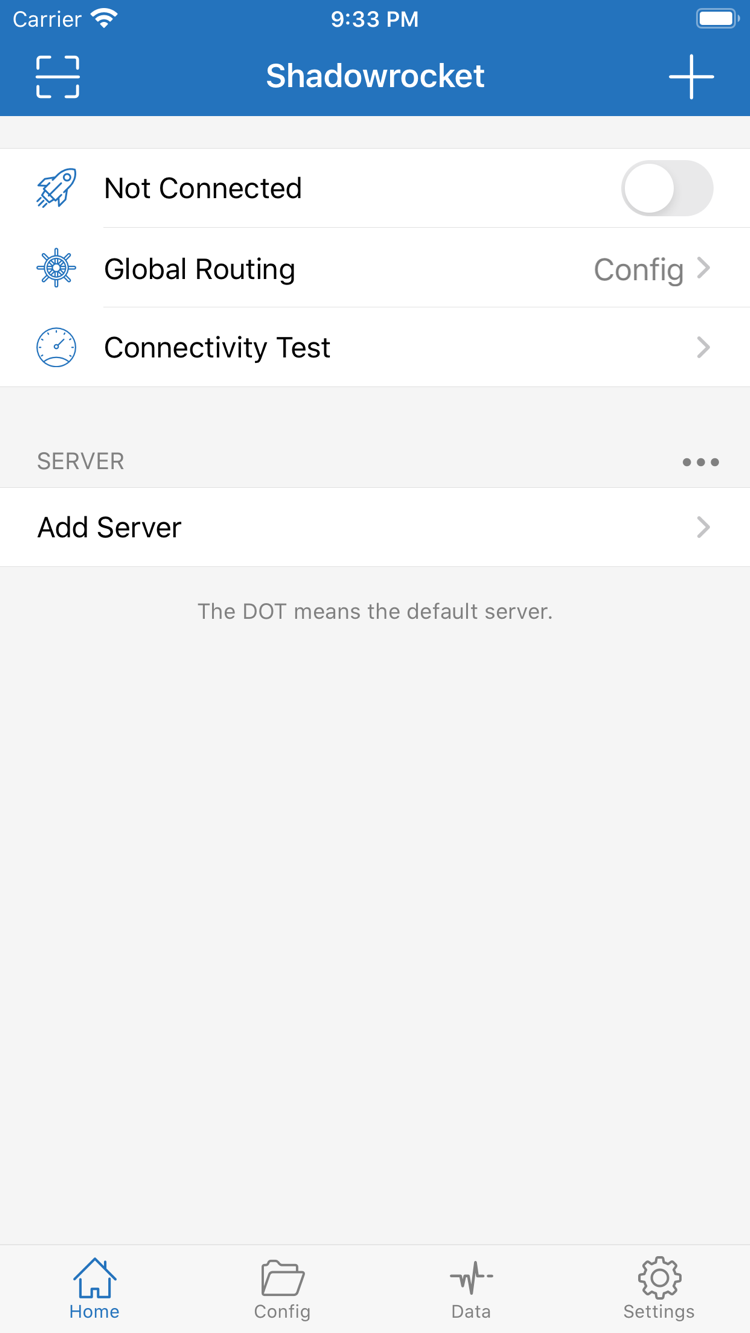
After importing a server, return to Home and tap Global Routing. This controls how traffic is handled when the connection is on; it’s separate from choosing a server in SERVER. The three modes are Config / Proxy / Direct. Note your selection during testing so you can interpret the access results in context.
Config: Apply the rules in a configuration file
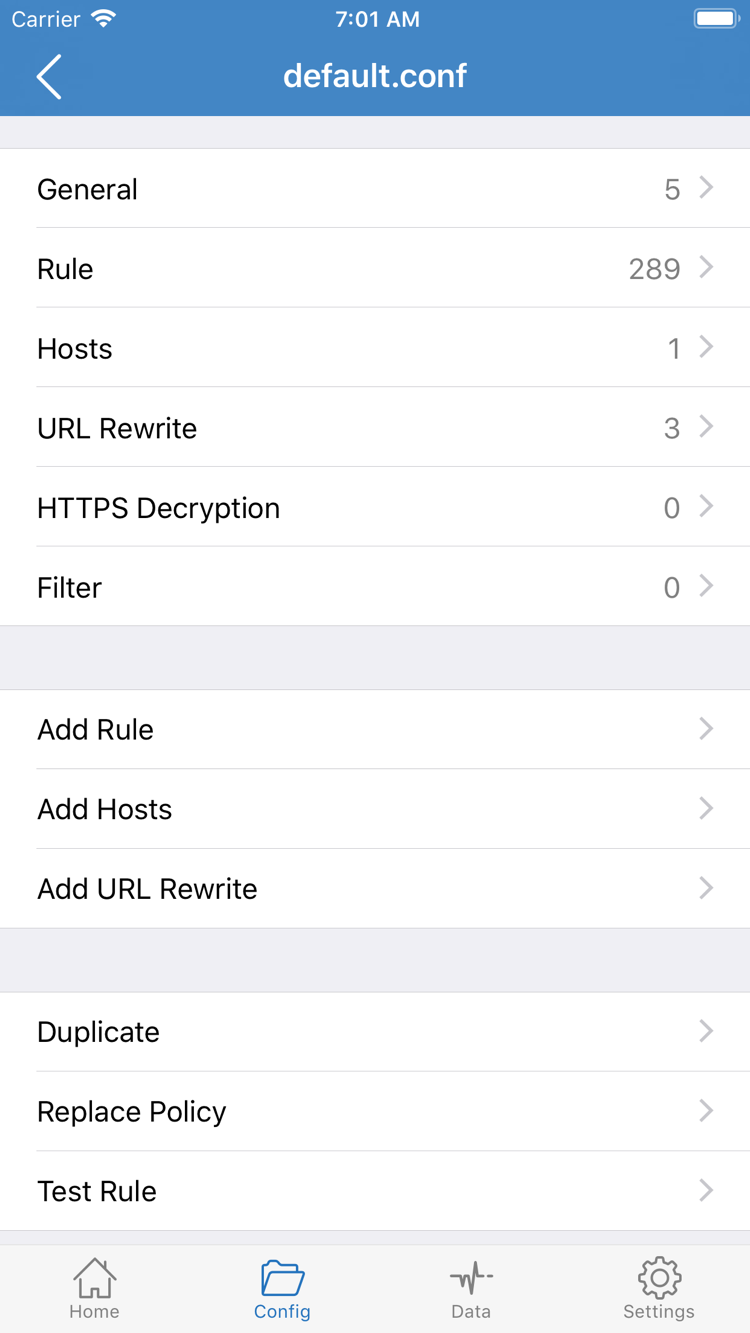
For day-to-day routing by domain or address, use Config. Open the Config page and confirm that the configuration file you intend to use is present and selected. Open it to review sections such as General, Rule, and Hosts. Rules in Rule determine which policy applies when a request matches. Importing a configuration file into the list doesn’t mean it’s active; return to the list and check that it’s selected.
If you don’t have a ready-to-use Config, don’t assume that importing a subscription automatically creates rules suitable for every situation. First confirm the source and purpose of any configuration you have. To check server availability during initial troubleshooting, you can temporarily use Proxy for comparison, then switch back to Config. Don’t overwrite an existing file just to complete this guide. You don’t need to enable HTTPS Decryption or add URL Rewrite for your first connection.
Proxy and Direct: Compare traffic paths
Proxy routes traffic handled by the client through the proxy path, which can help you check whether the server itself is available. This doesn’t mean every request from every app can be verified in the same way, nor does it replace checking the service on the server side. Direct uses a direct access path; if a webpage opens in this mode, that doesn’t confirm the selected server is working. To compare the two modes, switch only this setting on the same network and test the same page, then note the difference.
To understand rules, check the matching conditions first, then the final policy. The example below shows rule syntax; it is not a complete configuration to replace your current Config. The actual destination for PROXY must match the policy definitions in your configuration and the server currently selected.
DOMAIN-SUFFIX,example.com,PROXY
GEOIP,CN,DIRECT
FINAL,PROXY
Rules are usually checked in order. A match near the top can determine whether later rules are considered. FINAL handles requests that don’t match any preceding rule. As a result, the same server can produce different access results under different Config files. When getting started, use a small number of clearly defined test cases instead of expanding the rule set right away. For more detailed rule troubleshooting, see Troubleshooting.
Check your work: Identify the current Global Routing mode. If you selected Config, also identify the configuration file currently in use. Note both before authorizing the connection.
STEP 03 / CONNECT
Home: Select a server and connect
Return to Home and select the server you want from the SERVER list. If there are multiple entries, start with one whose details you’ve confirmed are complete and whose service is active. Don’t switch servers repeatedly during your first test. Check that Global Routing is still set to the mode you chose in the previous step, then turn on the connection switch at the top of Home. Not Connected in the screenshot means the connection isn’t established; it isn’t a server name.
The first time you connect, your iPhone or iPad may show a system prompt to add a VPN configuration. This authorization allows the app to configure the network connection. Read the prompt, confirm that it was triggered by the Shadowrocket switch you just turned on, and complete device authentication as requested. If you cancel the prompt, return to the app and try connecting again. Don’t delete the server or reset all settings just because the switch didn’t stay on.
System authorization and server authentication are separate. The first allows the device to use the VPN configuration; the second still depends on the Host, Port, authentication details, and server settings being correct. After authorizing, return to Home and check whether the connection status changes and the switch stays on. The VPN indicator can vary by device layout and location, so don’t rely on a single status-bar icon as your only check.
If the switch turns off shortly after you turn it on, first confirm that system authorization is complete. Then check whether another VPN configuration, device management restriction, or On Demand setting is affecting the connection. During your first manual test, note any existing On Demand settings so automatic connection behavior doesn’t complicate troubleshooting. Don’t remove other configurations from the device if you’re unsure what they do, especially on a managed device.
If the switch stays on, keep the current server and mode for now. Don’t immediately change DNS, TCP, or UDP options. The connection status shows that the local connection process has progressed, but it doesn’t guarantee that webpages will load. Use Connectivity Test and an actual webpage to check where the problem occurs.
Check your work: A server is selected in SERVER, system authorization is complete, and the connection switch stays on. If the process repeatedly stalls at authorization or the switch, go to Common issues on this page and resolve the connection problem first.
STEP 04 / VERIFY
Connectivity Test: Check whether the connection works as expected
Keep the network, server, and Global Routing mode from the previous step unchanged. Tap Connectivity Test on Home and wait for the result. It provides a clue about reachability; it isn’t a complete check of every website, protocol, or app. Results can mean different things depending on the test method, so don’t judge everyday performance by the number alone or assume one successful test proves the entire configuration is correct.
Next, open a browser and visit a familiar page you can test repeatedly. First check whether it loads, then test the specific feature you need. If you’re using Config, test one request expected to use the proxy and another expected to use DIRECT. Testing only a page that is normally accessible directly won’t tell you whether the proxy path is working.
If you suspect a rule is causing the difference, keep the selected server unchanged, temporarily switch to Proxy, and revisit the same page. If Proxy works but Config doesn’t, focus on the current Config, rule order, policy target, and DNS. If both modes fail, check the server and basic network first. This is a comparison test, not a recommendation to leave every problem unresolved by switching modes.
When comparing results, account for browser cache and existing connections. If needed, reopen the page or retry the app request so an old connection doesn’t affect what you see. Don’t visit unfamiliar test sites just to verify the connection, and never submit subscription or authentication details to a webpage. If you’re checking whether a particular service works, test that service under the same conditions.
Record four details: the network you’re using, the selected server name, the Global Routing mode, and what happened on the test page. For example: “On Wi-Fi, server A, Config mode, page opens but images don’t load.” Use local labels for server names; don’t include actual addresses or authentication details in public reports.
STEP 05 / DIAGNOSE
Settings: Troubleshoot common issues based on symptoms
When something goes wrong, stop making repeated changes to settings. Turn off the Shadowrocket connection and confirm the device’s basic network can access pages that normally work. On public Wi-Fi, complete any required network sign-in first. Then reconnect and follow the steps for the symptom below. Change only one condition at a time and repeat the same test from step four.
Subscription saved, but no server entries appear
Check that the URL was copied in full, the subscription is still valid, and the current network can retrieve its contents. Don’t mistake an ordinary webpage URL for a subscription URL, and don’t add the same URL as multiple groups. If you had a working list before an update failed, keep the entries while you investigate. Check link permissions, expiration, and returned content against information from your existing service provider. The client can’t fill in missing server details for you.
Server test times out, or there’s no access after connecting
Compare Host, Port, Type, and authentication fields with the original details. Then check whether TLS, transport, and other options also match. A timeout indicates that reachability needs further investigation, but it doesn’t prove that the password is wrong. To compare Wi-Fi with cellular data, change only the network and keep other conditions the same. If the issue occurs on only one network, note the difference; don’t overwrite Config immediately. For a step-by-step process, see Troubleshooting server timeouts.
If Connectivity Test returns a result but webpages still won’t load, check whether Global Routing is set to Direct by mistake, or whether Config assigns the destination to an unexpected policy. After checking the rules, review DNS. Don’t change DNS and the server at the same time; if access returns, you won’t know which change fixed it.
Test results differ after changing settings
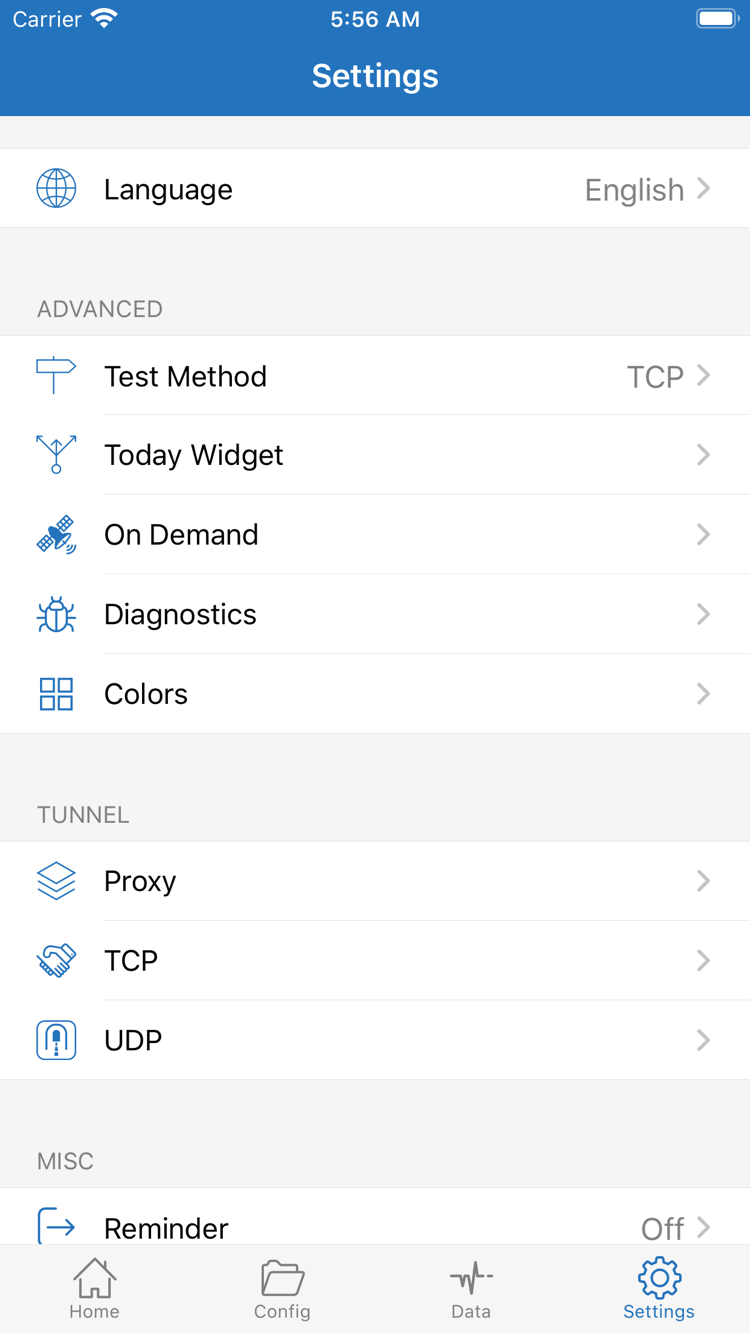
Open Settings and check Test Method. Results from different test methods aren’t directly comparable. Diagnostics can provide more clues, but when you’re getting started, avoid changing options under Proxy, TCP, UDP, and other groups without a reason. If an issue began after changing a setting, restore that setting first and repeat the original test. You don’t need to clear the entire app.
On Demand can start a connection when its conditions are met. If the connection comes back after you turn it off manually, check those settings. First verify the connection manually, then set up automatic connection conditions. The same order applies on iPad. Window size or orientation may move interface controls, but doesn’t change the separate roles of subscriptions, servers, and Config.
When preparing troubleshooting details, keep the error message, steps taken, and conditions, but remove sensitive information such as subscription URLs, Password, UUID, and real server addresses. Check screenshots for the same information. If an issue occurs after an app update, note your current settings, check the app’s App Store information, and retest one item at a time. Don’t assume a configuration is invalid based on a single failed test.
Check your work: Identify whether the failure occurs during import, authorization, server reachability, rule processing, or actual access. For basic issues, see the FAQs. For step-by-step checks of DNS, battery use, or post-update issues, see Troubleshooting. Don’t change every advanced option at once while getting started.
What to read after your first connection
Keep the server and Config you’ve verified working, then learn about rules and On Demand as needed. Handle subscription updates and configuration file changes separately. After each change, repeat the same set of access tests so you can spot differences and revert if needed.